Cleaning gutters ranks right up there with one of my least favorite activities. Especially at our new house, where the gutters on one side of our house are 20' and next to our main power line. I don't mind heights, but I am not fond of the idea of climbing on the roof like Santa. Little did I know that Kyle does not mind this task!
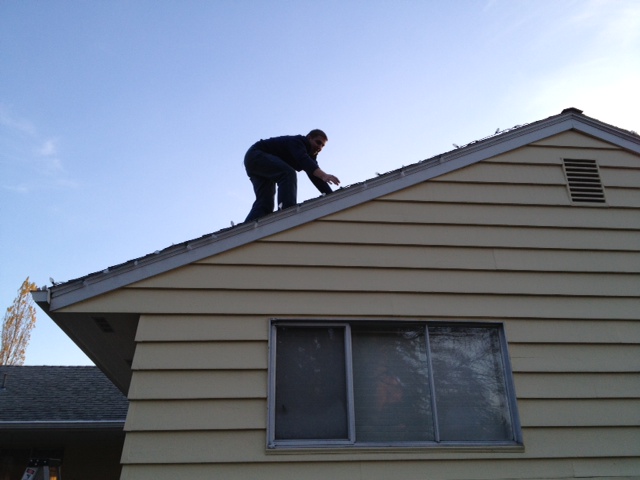
So - off to the Depot to get a 16' extension ladder and 200' of gutter guard to hopefully reduce our gutter cleaning events.
I have to say that I was a little surprised when Kyle volunteered to climb on the roof to install the gutter guard and while he was up there - the Christmas lights. Major husband brownie points!
I worked cleaning the gutters and Kyle installed the new gutter covers. I was hoping this project would take us a few hours, but as you can see from the fading light in the last picture, it took all day and into dusk - but it is DONE!
My mom also crafted up a winter evergreen basket with cuttings from our blue spruce, oregon grape, and pine tree and we created the JOY letters with scrapbook paper on painted paper mache letters. Lastly - forcing paperwhites - my favorite winter flower.
Overall - 2012 was full of change, new challenges, and adventures.
Now off to start the New Year!
Tuesday, January 1, 2013
Sunday, November 11, 2012
Finishing Touches
The shiny brass door knobs had to go. Some of our knobs were brass on one side and silver on the other side, which was especially bizarre. Off to Home Depot to find new outdoor locks and get them all re-keyed. Little advice - don't try to do this on a Sunday afternoon... They were of course super busy and only had one guys trained to re-key locks, so the wait was long. When we got home and tried the key in each lock, we found out they forgot one. Back to Home Depot to convince them that going through the last few weeks of keys to find the one that matched our lock so that they could fix their mistake was not a reasonable request - they finally gave us a new one.
We hired professionals to put in the new outdoor locks and to add dead bolts. Of course - after they were done, Kyle was bound and determined to redo all of the interior knobs himself. It took him over a day to get the first one off...there was definitely a trick to it which he discovered on the second one. You have to pop off the collar around the knob, then use a paperclip/letter opener to push down on a button within a tiny hole while rotating the knob to the correct position. Then he discovered that the new latch hole was a different size then the existing hole, so back to the Depot for the correct hole saw bit. What we thought was an afternoon project turned into a week long chore, but they are all done - fhew!
The old chime doorbell was another item that we wanted to get rid of. Instead of investing in a new doorbell, we decided to find a way to cover up the eyesore. Originally we thought about finding a piece of framed art to hide the 12" x 47" inset doorbell, but then thought about having a canvas made with a picture from one of our hikes.
We looked through all of Kyle's panorama photography of trees and waterfalls and decided on dry falls. The canvas we ordered is 18" x 48" and is a welcome sight above our stairs. One more thing to check off the house to-do list! Last but not least, we removed the front screen door and took out the last of the garden veggies and planted a cover crop for the winter. Now for some pictures!
| The only BEFORE picture I could finding showing the brass door knobs |
![]() |
| Door knobs off - finally! |
![]() |
| New knob done! |
![]() |
| New bathroom knob - adios brass! |
![]() |
| BEFORE - Large chime doorbell |
![]() |
| Kyle panorama of dry creek falls |
![]() |
| Love looking at this waterfall instead of our old doorbell! |
![]() |
| BEFORE - Front door with Screen |
![]() |
| Screen - getting ready to find a new home |
![]() |
| BEFORE - Screen off but old brass hardware still remains... |
![]() |
| Screen off and Hardware done! Now - what color to paint the door? |
![]() |
| Cover crop starting to grow |
Saturday, October 27, 2012
Fireplace Transformation
The brass fireplace screens had to go. I didn't want to spend money on new ones, so I decided to paint them. I found some great guidance on Pinterest and headed off find Rust-oleum high heat spray paint. I sanded, cleaned, and covered the glass and then waited for a break in the rain to run outside and paint them. It was super fast and easy and I love the look of the finished black screens.
Then it was time for my personal decorator (mom) to come over and help me arrange the mantels. I have quite a collection of K's, so we decided to display them in the family room. We found a large unfinished papermache K and decoupaged it with map pieces from places that Kyle and I have traveled together to provide size variety on the wall. I attached the K's to the brick fireplace using Command strips so that I can change it up whenever I want without leaving holes all over the brick.
Now for some before, during, and after pictures!
![]() |
| Living Room - BEFORE |
![]() |
| Living Room Fireplace without screen |
![]() |
| Screen - ready for painting |
![]() |
| Painting time! |
![]() |
| Living Room - AFTER |
![]() |
| Family Room - BEFORE |
![]() |
| Second one ready to go |
![]() |
| Family Room Screen Painted |
![]() |
| Family Room - AFTER |
![]() |
| Decoupaged Map K |
Thursday, October 18, 2012
Just In Time
for the rain to begin....
I know - it is crazy to stain your deck in October - that is even what the hardware store told me as I bought their last three cans of cedar colored Penofin stain...but we made it just in time!
I had my first experience with a power washer - it is satisfying to see the difference it makes, but what a tedious job!
Then choosing the stain...
Being the Engineer that I am - I had to do my research.
I found a great website that rates stains and then narrowed it down based on the single fact that I did not have time to order one of the "best" ones.
http://www.deckstainhelp.com/category/deck-product-reviews/deck-stain-reviews/
We learned some valuable lessons when staining:
1. Don't use a painting mitt. Seems like a great idea - right! Save time on the rails by using your hand as the brush...that is until each rail is coated in little bits of fuzzy mitt.
2. Do use paint pads but buy the more expensive long handle extension. Our wood one broke in about 5 minutes.
3. If it is windy - go ahead and secure the plastic paint liner to the tray. Yup - we dumped stain all over when the wind picked up the liner. Duck tape to the rescue...again.
4. When it says wipe down the stain within 30 minutes - they mean it. We ended up with some "extra" stain in some places.
Another project we finished just in time was trimming the bottom branches of a few large "Christmas" trees that we have. They were looking very dated so my mom and I worked to show off their trunks and it made such a difference.
Last but not least - my car is parked in the garage! The garage is definitely not what you would call clean or organized - but I made it fit. Yippee!
Now for some before and after pics:
| Deck before - covered in lichen |
| Powering washing...so tedious |
| BEFORE power washing on the left - AFTER on the right. |
![]() |
| Deck done |
![]() |
| This is a terrible before pic - but the tree we trimmed is on the far left |
![]() |
| No more out of control Christmas tree |
![]() |
| Before of second tree |
![]() |
| After - look it has a trunk! |
![]() |
| Happy wife = happy life |
Saturday, October 6, 2012
5 Months Later...
The living and dining room have taken us a long time to decorate, but they are finally looking finished and I am so happy with the result. Since we moved from a 900 square foot house, we really didn't have living or dining room furniture. It was fun to have a clean slate to work with, but also meant that we had a lot of furniture to agree on. My decorating consultant mom shopped all around to help find the right pieces and I owe much of the credit to her!
Here are some before and after pictures...
![]() |
| oh those mirrors! |
![]() |
| old drapes and nasty carpet |
![]() |
| light pink walls and cream carpet.... |
![]() |
| Finished Living room! |
![]() |
| Living and Dining Rooms |
![]() |
| The fireplace still needs some work... |
![]() |
| Dining room with new drapes |
Saturday, August 18, 2012
Dining Room Light!
We finally replaced the horrible off center brass dining room light today with a new burlap pendent light! When I first went looking for dining room lights, I found one that I really liked, but after getting it home and putting it together completely, I realized that I could not use it without moving the electrical connection. As much fun as that sounded, I returned the light and went on the hunt for a new dining room light with a chain so that we could use a hook to center it over the table.
When I finally found the one I wanted in June, it was back-ordered. It FINALLY arrived and Kyle put it together and helped hold it while I figured out the right height. He is a patient guy! Then Steve came over and installed it for us - thank you!
I love the texture of the shade and the size. Worth the wait!
We have more volunteer plants in the garden this summer! This massive sunflower came up and I have to say that I was a little worried that it was just a giant weed, but then it started blooming and now it is 9 feet tall! We also have a volunteer clematis that has found a nice spot to rest on one of the deck chairs after climbing up over 10 feet!
Subscribe to:
Posts (Atom)


